- 1. c++11 新的语言特性
- 强类型枚举 enum class
- 类内初始值 (in-class initializer)
- nullptr
- initializer list
- auto
- 类型别名 (type alias) 和 模板别名 (template alias)
- decltype
- 类型特征 (type traits)
- lambda 表达式
- constexpr
- range-based for loop
- default functions
- deleted functions
- Converting constructors
- 右尖括号(Right angle brackets)
- noexcept
- 显式指定虚函数 override
- final 标识符
- long long
- 万能引用与完美转发
- 用户定义字面量 (user-defined literals)
- Attributes
- raw string literals
- char16_t 和 char32_t
- 2. c++11 新的库特性
- 3. 拓展阅读
- 4. 参考
本文记录 c++11 的新特性。
c++11 是一个 major 版本,带来了大量的新变化,在很多年的时间里,它也一直被称为 c++0x。
这篇笔记的主干参考自这份 cheatsheet: 《AnthonyCalandra modern-cpp-features》,但由于 cheatsheet 实在过于简单,几乎没有讲任何原理性的东西,所以本文补充了不少内容。
1. c++11 新的语言特性
概览
参考自:《c++11:感觉像是门新语言》 [1]。
- 内存模型——一个高效的为现代硬件设计的底层抽象,作为描述并发的基础
- auto 和 decltype——避免类型名称的不必要重复
- 范围 for——对范围的简单顺序遍历
- 移动语义和右值引用——减少数据拷贝
- 统一初始化—— 对所有类型都(几乎)完全一致的初始化语法和语义
- nullptr——给空指针一个名字
- constexpr 函数——在编译期进行求值的函数
- 用户定义字面量——为用户自定义类型提供字面量支持
- 原始字符串字面量——不需要转义字符的字面量,主要用在正则表达式中
- 属性——将任意信息同一个名字关联
- lambda 表达式——匿名函数对象
- 变参模板——可以处理任意个任意类型的参数的模板
- 模板别名——能够重命名模板并为新名称绑定一些模板参数
- noexcept——确保函数不会抛出异常的方法
- override 和 final——用于管理大型类层次结构的明确语法
- static_assert——编译期断言
- long long——更长的整数类型
- 默认成员初始化器——给数据成员一个默认值,这个默认值可以被构造函数中的初始化所取代
- enum class——枚举值带有作用域的强类型枚举
强类型枚举 enum class
这是非常好的特性,解决了 c style enum 的问题:隐式转换、无法指定基础类型、作用域污染。
示例[7]:
// 指定基础类型为 `unsigned int`
enum class Color : unsigned int { Red = 0xff0000, Green = 0xff00, Blue = 0xff };
// `Red` / `Green` 与 Color 中的定义不冲突
enum class Alert : bool { Red, Green };

Color c = Color::Red;
类内初始值 (in-class initializer)
c++11 之后,非 static 成员变量可以在声明时初始化,不需要再放在构造函数里初始化。
static 的成员变量,如果是 const 的,则也可以使用这种类内初始化。
需要注意的是,只能用 = 号或 {} 号来赋初始值,不能使用圆括号 () 来赋初始值。
// c++11 之前
class Man {
    int age;
    double height;
public:
    Man() : age(0), height(0.0) {}
};


// c++11
class Hand {
    int x = 0;  // ok
public:
    Hand(int _x) : x(_x) {}
};

class Man {
    int age = 0;         // ok
    double height {0.0}; // ok

    Hand h(100);  // not ok,会报错,不能使用圆括号初始化,得这样 Hand h {100};

    static const int cnt = 0;  // ok,static 加上 const 修饰是可以类内初始化的
    static int x = 10;         // not ok,非 const 的 static 变量,需要放到类定义去初始化,得在声明之外这样写: int Man::x = 10;
public:
    Man() {}
};
nullptr
nullptr 是 c++11 新引入的空指针字面值,用于代替 c style 的 NULL 宏,以解决 NULL 相关的歧义问题。
nullptr 对应的类型是 std::nullptr_t,它可以隐性转换为任意指针类型,但不可隐性转换为整数类型或 bool 类型(NULL 可以,这也是它会造成歧义的原因)。
比如这样:
void f(int);
void f(int*);

f(NULL);     // 错误,不确定调用哪个好
f(nullptr);  // 调用 f(int*)
值得指出的是,这篇文章 《modern-cpp-features/CPP11.md》 或 wikipedia 的词条 《c++11/Null pointer constant and type》 都写到: “nullptr itself is of type std::nullptr_t and can be implicitly converted into pointer types, and unlike NULL, not convertible to integral types except bool”。
但实际上,这与最终的标准 《cppreference std::nullptr_t》 是有出入的,nullptr_t 并不支持隐性转换到 bool 类型。
std::nullptr_t is the type of the null pointer literal
nullptr. It is a distinct type that is not itself a pointer type or a pointer to member type. Prvalues of this type are null pointer constants, and may be implicitly converted to any pointer and pointer to member type.
initializer list
初始值列表,对应的标准库类型是 std::initializer_list,头文件是 <initializer_list>。
std::initializer_list 类型的对象是一个轻量级代理对象,提供对 const T 类型对象数组的访问,要注意,std::initializer_list 中的值都是常量。
通常用于构造函数或函数参数,以允许传递一个初始化元素列表,可以用大括号初始化来构造 initializer_list,比如 {1,2,3} 就创建了一个数字序列,它的类型为 std::initializer_list<int>。
用大括号括起来的一串元素,需要在特定的条件下才会被构造为 std::initializer_list:
- 用大括号括起来的初始化 list 用于对象的列表初始化,其中相应的构造函数接受一个
std::initializer_list类型的参数。 - 用大括号括起来的初始化 list 用作赋值的操作数或函数调用参数,其中相应的赋值运算符/函数接受一个
std::initializer_list类型的参数。 - 用大括号括起来的初始化 list 绑定到
auto,包括范围 for 循环。
示例代码[7]:
int sum(const std::initializer_list<int>& list) {
    int total = 0;
    for (auto& e : list) {
        total += e;
    }
    return total;
}

auto list = {1,2,3};  // list 推导出来的类型是 std::initializer_list<int>
//auto list2 {1,2,3};   // 错误,无法推导
sum(list);    // 结果是 6
sum({1,2,3}); // 结果是 6
sum({});      // 结果是 0

// 输出 1 2 3
for (auto x : {1, 2, 3})
    std::cout << x << " ";
有了 initializer_list 之后,标准库的一些容器就可以支持使用这种类型来构造,比如 std::vector,在 c++11 后,加入了这样的构造函数,vector( std::initializer_list<T> init, const Allocator& alloc = Allocator() )。
可以这样构造一个 vector :std::vector<int> v {1,2,3} 或 std::vector<int> v = {1,2,3},效果都一样。
上文提到在特定条件下才会构造 std::initializer_list,下面举一个例子说明,参考自 《c++中为什么push_back({1,2})可以,emplace_back({1,2})会报错?》 :
vector<vector
> a; a.push_back({1,2});可以 a.emplace_back({1,2});报错
原因是:
-
{}大括号初始化器列表不是表达式,因此它没有类型,意味着模板类型推导无法推导出与花括号初始化器列表相匹配的类型。 -
push_back不是成员函数模板,它只是使用了类模板std::vector的类型模板形参,当实例化了的对象调用这个成员函数时,它的参数是确定,使用{}没问题,相当于调用对应的构造函数构造一个临时对象出来。 -
emplace_back是成员函数模板,用到了形参包、包展开、完美转发、布置 new 等技术,它是模板,推导不出{}是什么。
而要让 emplace_back 可以工作,只能变相这样:
// 手动构造一个 initializer_list
a.emplace_back(std::initializer_list<int>{1,2});

// 手动指定模板参数类型,放弃自动推导
a.emplace_back<std::initializer_list<int>>({1,2});

// 用 auto 构造
auto x = {1, 2};
a.emplace_back(x);
auto
auto 声明的变量的类型可以由编译器根据初化值进行类型推导 (deduce),这个是在编译期间决定的。
示例[7]:
auto a = 3.14;  // double
auto b = 1; //int
auto& c = b; // int&
auto d = { 0 };  // std::initializer_list<int>
auto&& e = 1;  // int&&
auto&& f = b;  // int&
auto g = new auto(123); // int*
const auto h = 1; // const int
auto i = 1, j = 2, k = 3;  // int, int, int
auto x = 10 + 3.14;    // double,使用表达式的结果进行推导
auto l = 1, m = true, n = 1.61;  // 错误,一个声明语句只能有一个类型
                                 // 而 `l` 推导为 int,`m` 推导为 bool
auto o;  // 错误,需要给出初始化值

auto aa {10} ; // c++11 是 std::initializer_list<int>,c++17 改为 int
可以用于声明容器的 iterator 变量,代码简洁很多 [7]:
std::vector<int> vec {1,2,3};
std::vector<int>::iterator oldstyle_iter = vec.begin(); // 旧的方式
auto iter = vec.begin();  // 新的方式比旧的方式简洁特别多
也可以用于推导函数的返回值,比如这样:
// in c++11
auto f(int a, int b) -> decltype(a+b) {
    return a+b;
}
但看起来挺麻烦的,还不如不要这么写。不过,在 c++14 中,就可以省掉后面的 decltype 了,c++14 支持 “return value deduce” 了。直接这样就行:
// in c++14
auto f(int a, int b) {
    return a+b;
}
auto 有时候推断出来的类型与初始值的类型不一样,下面是一些规则。
1、初始值是一个引用时,真正参与初始化的其实是引用对象的值。
#include <iostream>

int main() {
    int x = 20;
    int& y = x;
    auto z = y;  // z 的类型是 int,而非 int&

    std::cout << std::is_reference<decltype(y)>::value << std::endl; // 输出1
    std::cout << std::is_reference<decltype(z)>::value << std::endl; // 输出0

    return 0;
}
2、auto 一般会忽略掉顶层 const,而底层 const 则会保留下来[10]。
比如:
int i = 100;
const int ci = i, &cr = ci;
auto b = ci;  // b 是一个整数(ci 的顶层 const 特性被忽略掉了)
auto c = cr;  // c 是一个整数(cr 是 ci 的别名,ci 本身是一个顶层 const)
auto d = &i;  // d 是一个整型指针
auto e = &ci; // e 是一个指向整数常量的指针,即 const int*
              //(对常量对象取地址是一种底层 const)

*e = 100;     // not ok,会编译报错,e 所指之物是 const
e = nullptr;  // ok,e 本身不是 const
如果希望推断出的 auto 类型是一个顶层 const,则要显式指明[10]:
const int ci = 100;
const auto f = ci;
使用 auto 的原则:能一眼看出是什么类型的就用 auto,否则不用。比如 Stroustrup 举的这个例子[1]:
auto n = 1;  // 很好:n 是 int
auto x = make_unique<Gadget>(arg);  // 很好:x 是 std::unique_ptr<Gadget>
auto y = flopscomps(x, 3);          // 不好:flopscomps() 返回的是什么东西?
类型别名 (type alias) 和 模板别名 (template alias)
基本用法是: using idetifier = type;
类型别名
类似于 typedef,但是可读性更强。
示例:
// 类型别名,等价于 typedef std::string MyString;
using MyString = std::string;
// MyString 现在标识一种类型,name 的类型是 std::string
MyString name = "Mike";

// 类型别名,等价于 typedef std::ios_base::fmtflag flags;
using flags = std::ios_base::fmtflag;
// flags 现在标识一种类型
flags fl = std::ios_base::dec;

// 类型别名,等价于 typedef void(*func)(int, int);
using func = void(*)(int, int);

// func 现在标识一个指向函数的指针
void example (int, int) {}
func f = example;

// 类型别名用于隐藏模板参数 ??(todo:不太理解这个)
template<class CharT>
using mystring = std::basic_string<CharT, std::char_traits<CharT>>;

mystring<char> str;

// 类型别名可以引入一个 typedef 名字成员
template<typename T>
struct Container { using value_type = T; }
模板别名
typedef 无法应用于 template,而 using 可以。
模板别名需要在 class scope 或 namespace scope 定义,不能在函数体内定义。
示例:
template<typename T>
using Vec = std::vector<T>;
Vec<int> vec {1,2,3};         // vec 的类型是 std::vector<int>

template<typename T>
using Ptr = T*;   // Ptr 现在是 T 类型指针的别名
Ptr<int> x;       // x 的类型是 int*
decltype
decltype 是一个运算符,它可以返回传递给它的表达式的声明类型,如果表达式有 const/volatile 修饰符或引用,也会被保留下来。
decltype 总体上分为两种情况处理:
-
参数不是以圆括号括起来的 (unparenthesized) id 表达式(id-expression) 或 类成员访问表达式 (class member access expression),则返回的是这个表达式对应的实体的类型。
-
除 1 的情况外,则:
2.1 如果表达式是将亡值 (xvalue),则返回 T&&;
2.2 如果表达式是左值(lvalue),则返回 T&;
2.3 如果表达式是纯右值(prvalue),则返回 T。
总结起来即是:decltype((variable)) 的结果永远是引用,而 decltype(variable) 的结果只有当 variable 是引用的时候才是引用。
除上面讲的,还有一种情况,如果表达式的内容是解引用操作,则 decltype 将得到引用类型。比如 int i = 10; int *p = &i;,则 decltype(*p) 得到的类型是 int&。为什么会这样呢?解引用指针可以得到指针所指的对象,而且还能给这个对象赋值。从这个语义上讲,就应该返回 int& 型。
示例[7]:
int a = 1;            // a 定义为 `int` 型
decltype(a) b = a;    // decltype(a) 是 `int` 型
const int& c = a;     // c 定义为 `const int&` 型
int& x = a;           // x 定义为 `int` 型
decltype(c) d = a;    // decltype(c) 是 `const int&` 型
decltype(x) d2 = a;   // decltype(x) 是 `int&` 型
decltype(123) e = 10; // decltype(123) 是 `int` 型
int&& f = 1;          // f 定义为 `int&&` 型
decltype(f) g = 1;    // decltype(f) 是 `int&&` 型
decltype((a)) h = g;  // decltype((a)) 是 `int&` 型,
                      // 因为 (a) 是用圆括号包起来的 lvalue,按照规则返回的就是 T& 型
template<typename X, typename Y>
auto add(X x, Y y) -> decltype(x+y) {
    return x+y;
}
add(1, 2.0); // decltype(x+y) => decltype(3.0) => double
另外,decltype(auto) 是 c++14 引入的新特性,见这篇文章:《c++ 笔记:c++14 的新特性》。
类型特征 (type traits)
定义了编译时的基于模板的接口,可以查看或修改类型的属性。
有大量的接口,可以参考: cppreference type_traits 。
示例:
int a = 10;
std::cout << std::is_integral<decltype(a)>::value << std::endl;           // 输出 1
std::cout << std::is_rvalue_reference<decltype((a))>::value << std::endl; // 输出 0
std::cout << std::is_lvalue_reference<decltype((a))>::value << std::endl; // 输出 1
lambda 表达式
lambda 是匿名函数对象,可以捕获作用域内的变量。具体实现上,它会被构造为一个类,而捕获的变量作为类的成员。
它的主要构成:一个捕获列表、一组可选的参数,一个可选的返回值类型,一个函数体。也就是说,捕获列表和函数体是必须给出的,另外二者可省略。
基本形式:
[ capture list ] ( parameter list ) -> return type { function body }
值捕获和引用捕获
捕获分两种,值捕获和引用捕获,值捕获是在 lambda 创建的时候拷贝对象;引用捕获是在 lambda 创建的时候创建对象的引用,跟正常的引用方式一样,在 lambda 函数体内可以改变外部变量的值。引用捕获的时候,需要在变量前加上 & 号,比如有个局部变量 v1,要引用捕获它,则是 &v1。
隐式捕获
除了显式的写出需要捕获的变量,还可以隐式捕获,即让编译器推测我们需要捕获的对象。
隐式值捕获则是在捕获列表的开头写上 = 符号,即 [=],如果要混合捕获,则形式是 [=,identifier_list],identifier_list 中的名字不能包含 this,且名字前都要加 & 号。
隐式引用捕获是在捕获列表的开头写上 & 符号,即 [&],如果要混合捕获,则形式是 [&,identifier_list],identifier_list 中的名字前不能加 & 号。
捕获的例子
捕获列表的形式[7]:
[]什么也不捕获[this]显式捕获,引用捕获this[a, &b]显式捕获,值捕获a,引用捕获b[=]隐式捕获,值捕获作用域内的局部变量或参数[&]隐式捕获,引用捕获作用域内的局部变量或参数[=,&a]混合捕获,值捕获除了a之外的对象,引用捕获a[&,a]混合捕获,引用捕获除了a之外的对象,以值的方式捕获a
示例[7]:
int x = 1;

auto getX = [=] { return x; };
getX();  // == 1

auto addX = [=](int y) { return x+y; };
addX(1); // == 2

auto getXRef = [&]() -> int& { return x; };
getXRef();  // int& to `x`
默认情况下,值捕获的变量在 lambda 表达式中不允许修改的,因为在实现上,会把这种变量设为 const 的,但如果在 lambda 表达式加上 mutable 关键字,则允许这么做。当然,改变也仅限于 lambda 表达式内,不会影响被实际的变量。
示例[7]:
int x = 1;

auto f1 = [&x] { x = 2; };  // ok,引用捕获,会改变引用对象的值

auto f2 = [x] { x = 2; };   // not ok,值捕获的变量,在 lambda 内部是 const 类型
                            // 不允许修改

auto f3 = [x]() mutable { x = 2; }; // ok,允许修改值捕获的变量,不过 mutable 需要跟随
                                    // 在参数列表后面,即使没有参数,也要写上 `()` 号
constexpr
常量表达式 (constant expression) 是指值不会改变并且在编译过程就能得到计算结果的表达式[10]。
字面值属于常量表达式,用常量表达式初始化的 const 对象也是常量表达式。
constexpr 是 c++11 新引入的关键字,用于修饰变量或函数。
constexpr 作用于变量
此处需要把它跟 const 进行对比。
1、const
const 表达式是潜在的常量表达式,如果用常量表达式初始化,它就是常量表达式,否则就不是。
const int a = 10;           // ok,10 是常量表达式
const int sz = get_size();  // ok,get_size() 不是常量表达式, 具体值要到运行时才确定
2、constexpr
constexpr 表达式也是潜在的常量表达式,但它比 const 严格,如果用来初始化的不是常量表达式,则编译报错。
constexpr 的作用就相当于由编译器来验证变量的值是否是一个常量表达式。
constexpr int a = 10;            // ok,10 是常量表达式
constexpr int sz = get_size();   // 不一定 ok,只有当 get_size() 是一个 constexpr 函数(即可以在编译期求值的函数)时才 ok,否则不 ok
特别的,当 constexpr 作用于指针时,它是把所定义的对象置为了顶层 const,即指针本身是常量,而非指针所指之物,这点与 const 也是存在差异的,const 允许设置顶层或底层常量。比如 constexpr int* p = nullptr; 就表示 p 本身是个常量。
关于顶层 const 和底层 const:
顶层 const,指针本身是 const 的,比如 int * const p = nullptr;,const 要放在 * 的右边。
底层 const,指针所指之物是 const 的,比如 const int * p = nullptr;,const 要放在 * 的左边。
constexpr 作用于函数
constexpr 修饰的函数,如果传入参数后能在编译期计算出来,那么这个函数就会产生编译时期的值。否则,就当成一个普通函数在运行时正常调用。
在 c++11 中,对于 constexpr 函数有这些规定:
- 函数的返回值类型及所有形参的类型都得是字面值类型;
- 函数体有且只有一条
return语句;
字面值类型就是指算术类型、引用、指针、枚举这些,而像普通的自定义类(字面值常量类除外)、IO 库则不是字面值类型。
示例[7]:
constexpr int square(int x) {
    return x*x;
}

int square2(int x) {
    return x*x;
}

int main() {

    // 编译期就算出了 square(2) 的值是 4,
    // 所以直接把结果赋值给变量 a, -4(%rbp) 即是 a 在栈上的地址
    // movl    $4, -4(%rbp)
    int a = square(2);

    // 运行期调用 square2,
    // movl    $2, %edi          ; 把参数放进 %edi 寄存器
    // call    square2(int)      ; 执行函数调用
    // movl    %eax, -8(%rbp)    ; 把函数返回值赋给变量 a,-8(%rbp) 即是 a 在栈上的地址
    int b = square2(2);

    return 0;
}
可以用一个小办法检测一个 constexpr 函数是否真正的编译时可求值,即利用 std::array 需要编译期常量才能编译通过的性质。参考自:《C++ const 和 constexpr 的区别?》 [11]。
示例[11]:
#include <iostream>
#include <array>

constexpr int get_size(int i) {
    return i+10;
}

int main() {
    int x = 100;

    get_size(5);  // ok
    get_size(x);  // ok

    std::array<int, get_size(5)> arr;  // ok
    std::array<int, get_size(x)> arr2; // not ok,编译报错

    return 0;
}
range-based for loop
for 遍历容器的语法糖。
示例[7]:
// 以引用的方式遍历,可修改容器内部的元素值
std::vector<int> vec {1,2,3,4};
for (auto& num : vec)
    num += 10;
// vec 变成 {11,12,13,14}


// 以值的方式遍历,不会修改容器内的元素值
std::vector<int> vec2 {1,2,3,4};
for (auto num : vec)
    num += 10;
// vec2 仍然是 {1,2,3,4}
default functions
一种更优雅和高效的方式,让编译器提供函数的默认实现,比如一个构造函数。
示例[7]:
struct A {
    A() = default;
    A(int x) : x {x} {}
    int x {1};
};
A a;         // a.x == 1
A a2 {123};  // a.x == 123
有继承的情况:
struct B {
    B() : x{1} {}
    int x;
};

struct C : B {
    // 会调用 B::B
    C() = default;
};

C c; // c.x == 1
deleted functions
一种更优雅和高效的方法让编译器不要为指定的函数生成默认实现。
示例[7]:
class A {
    int x;
public:
    A(int x) : x{x} {}
    A(const A&) = delete;
    A& operator=(const A&) = delete;
};

A x{123};
A y = x;  // 错误,调用了 deleted 的拷贝构造函数
y = x;    // 错误,operator = 也是 deleted
Converting constructors
Manual: cppreference - Converting constructor
右尖括号(Right angle brackets)
c++11 之前,右尖括号之间要有空格,否则报错。
// c++11 之前
std::vector<std::vector<int>> x;    // 不 ok,会编译报错
std::vector<std::vector<int> > x;   // ok
c++11 之后,不需要加空格了。
// c++11 之后
std::vector<std::vector<int>> x;    // ok
std::vector<std::vector<int> > x;   // ok
noexcept
有两个用法,一个是作为标识符 (specifier),一个是作为运算符 (operator)。作为标识符的时候是表明此函数不会抛出异常,作为运算符的时候是判断一个函数是否会抛出异常。
主要作用:帮助编译器进行优化,减少运行时开销。
1、作为标识符
specification: https://en.cppreference.com/w/cpp/language/noexcept_spec 。
表示一个函数是否会抛异常,是比 throw() 更好的替代。
void f1() noexcept;         // 不会抛异常
void f2() noexcept(true);   // 不会抛异常
void f3() throw();          // 不会抛异常

void f4() noexcept(false);  // 可能抛异常
noexcept 标识的不抛异常的函数,可以调用可能会抛异常的函数,也可以自己抛异常。但是,如果在运行时,noexcept 函数向外抛出了异常,程序会直接终止,调用 std::terminate() 函数,std::terminate() 内部会调用 std::abort() 终止程序。
示例[7]:
extern void f(); // 可能会抛异常的函数
void g() noexcept {
    f();           // 合法的,即使 f 可能抛异常
    throw 100;     // 合法的,相当于调用 std::terminate()
}
2、作为运算符
specification: https://en.cppreference.com/w/cpp/language/noexcept 。
编译时检查,如果表达式不会抛出任何异常则返回 true,否则返回 false。
显式指定虚函数 override
显式的指定重写了基类的某个虚函数。用于确保:
- 重写的函数是虚函数;
- 这个虚函数在基类是存在的。
示例[7]:
struct A {
    virtual void foo();
    void bar();
    virtual ~A();
};

struct B : A {
    void foo() override; // 正确,B::foo 重写了 A::foo
    void bar() override; // 错误,A::bar 不是一个虚函数
    void baz() override; // 错误,A::baz 不存在
    ~B() override;       // 正确,override 也可以特别的虚函数,比如虚析构
};
另外,override 不是关键字,所以可以用它作为变量名,比如 int override = 40;。
final 标识符
用于标识一个虚函数不能被重写 (override),或者标识一个类不能被继承 (inherited from)。
示例1[7],final 修改虚函数:
struct A {
    virtual void f();
};

struct B {
    virtual void f() final;
};

struct C : public B {
    virtual void f(); // 报错,f 在 B 中被标识为 final,不能被重写
}
示例2[7],final 修改类:
struct A final {};
struct B : A {}; // 报错,A 已经标为 final 了,不能被继承
long long
正式加入 long long,表示 (at leatst) 64 位的整数。整数类型及对应的宽度规定如下,参考自:《cppreference types》 [5]。
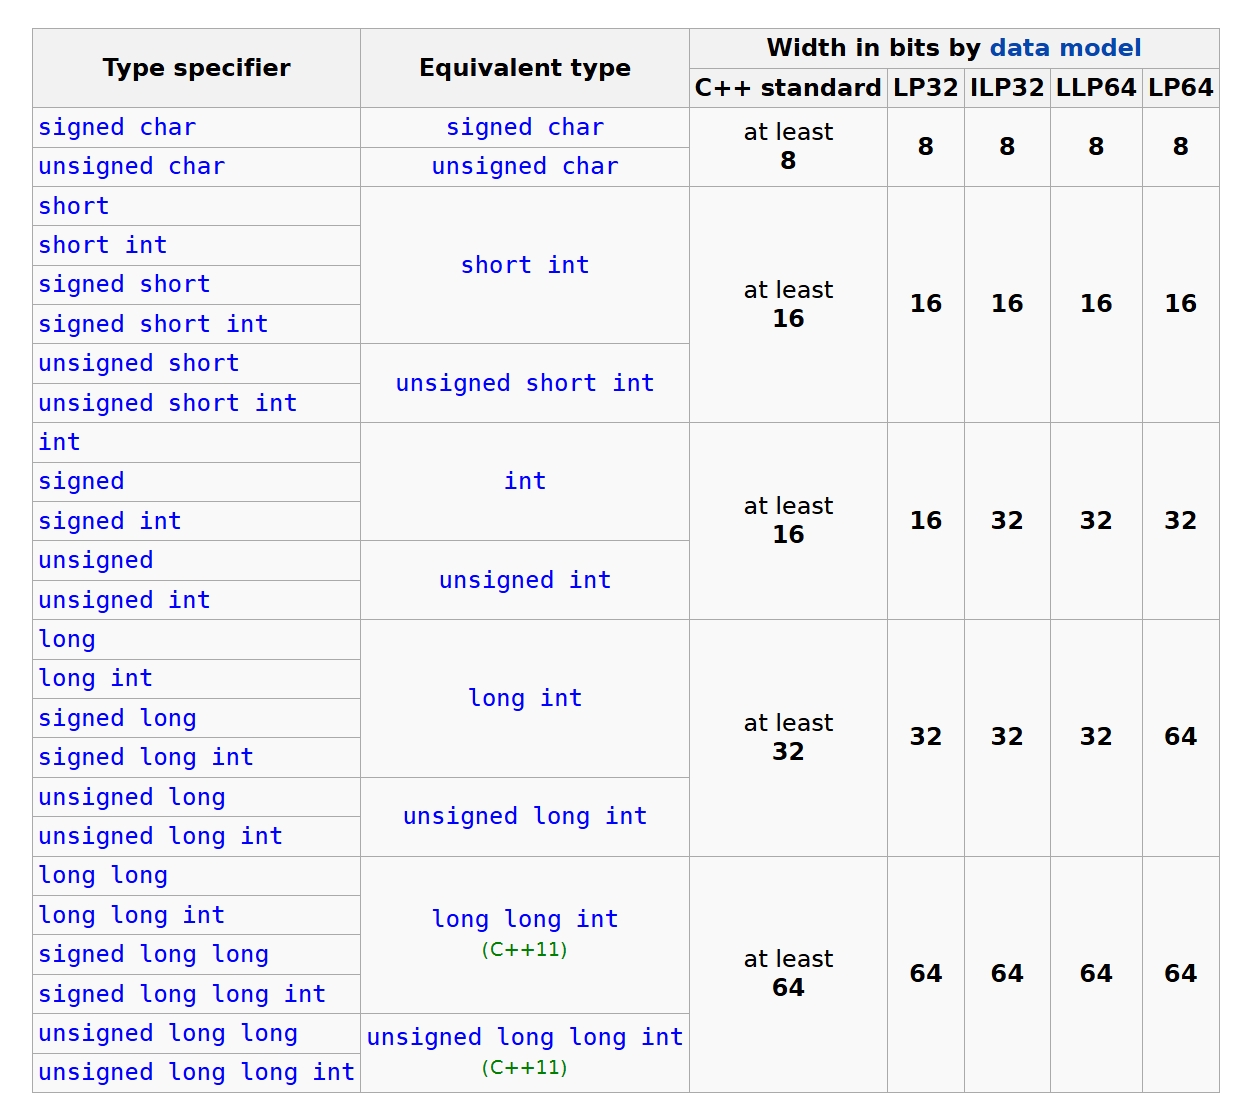
LP32 / LP64 之类的代表 data model,规定如下,参考自 《wikipedia 64-bit data models》 [6]。
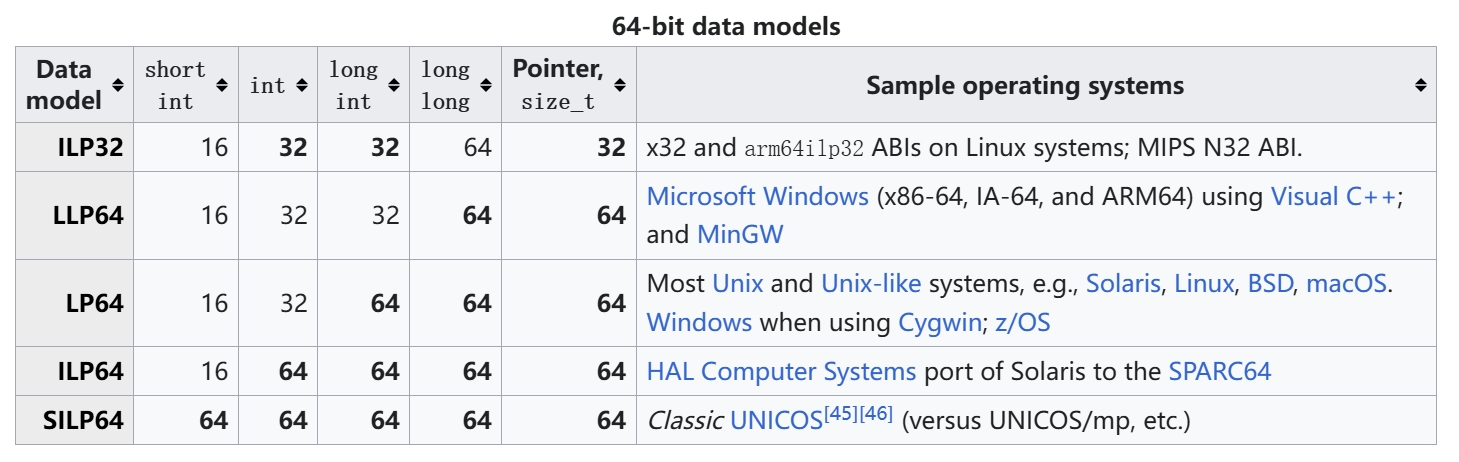
I 表示 int,L 表示 long,LL 表示 long long,P 表示 pointer。
LP32  表示 long、pointer 的宽度是 32 位。
ILP32 表示 int、long、pointer 的宽度是 32 位。
ILP64 表示 int、long、pointer 的宽度是 64 位。
LLP64 表示 long long、pointer 的宽度是 64 位。
LP64  表示 long、pointer 的宽度是 64 位。
万能引用与完美转发
万能引用
万能引用 (universal reference) 是 c++11 引入的,在 c++17 的标准里面已经将这种用法标准化为 “转发引用” (forwarding reference) [3],引用如下:
In the absence of our giving this construct a distinct name, the community has been trying to make one.
The one that is becoming popular is “universal reference.” Unfortunately, as discussed in §3.1 below,
this is not an ideal name, and we need to give better guidance to a suitable name.The name that has the most support in informal discussions among committee members, including the
authors, is “forwarding reference.” Interestingly, Meyers himself initially introduced the term “forward
ing reference” in his original “Universal References” talk, but decided to go with “universal references”
because at the time he did not think that “forwarding references” reflected the fact that auto&& was also
included; however, in §3.3 below we argue why auto&& is also a forwarding case and so is rightly included.
万能引用是一种特别的引用,它能够保留实参的 value category,使得可以通过 std::forward 转发实参的 value category[2]。不要以为 && 只用于右值引用,它也被用于表示万能引用,理解这一点很关键,不然会被搞得很糊涂。
万能引用目前有两种场景:
- 场景一:作为函数模板的形参
精确的定义是:”function parameter of a function template declared as rvalue reference to cv-unqualified type template parameter of that same function template” [2]。
示例[2]:
template<class T>
int f(T&& x) {                     // x 是万能引用
    return g(std::forward<T>(x));  // 可以被转发
}

int main() {
    int i;
    f(i);    // 参数是左值,调用 f<int&>(int&),std::forward<int&>(x) 是左值
    f(0);    // 参数是右值,调用 f<int>(int&&),std::forward<int>(x) 是右值
}

template<class T>
int g(const T&& x);  // x 不是万能引用,因为 const T 不是 cv-unqualified(即无 const/volatile 修饰)的

template<class T>
struct A {
    template<class U>
    A(T&& x, U&& y, int* p);  // x 不是万能引用,因为 T 不是构造函数的模板参数
                              // y 是万能引用
}
万能引用的两个判断标准:
- 必须是类型推导;
- 形式上必须是
T&&;
像这样就不是类型推导[4]:
void f(Widget&& param);
像这样就是严格的 T&& 形式[4]:
template<class T>
void f(std::vector<T>&& param); // param 不是万能引用,是右值引用
- 场景二:
auto&&
auto&& 除了花括号初始化的情况之外都是万能引用。
示例[2]:
auto && vec = foo();      // vec 是万能引用,foo() 可能是左值或右值
auto i = std::begin(vec); // 正常工作,无论 vec 最终是左值引用或是右值引用
(*i)++;                   // 正常工作,无论 vec 最终是左值引用或是右值引用

g(std::forward<decltype(vec)>(vec)); // 转发(保留了 vec 的值类别)

for (auto&& x : f()) {
    // x 是万能引用,这是使用 for range 遍历的通用形式
}

auto&& z = {1, 2, 3}; // 不是万能引用,这是初始值列表的特殊情况
拓展阅读
完美转发
完美转发是为了帮助撰写接受任意实参的函数模板,并将其转发到其他函数,目标函数会接受到与转发函数所接受的完全相同的实参[4]。也就是说,它能够转发实参的 value category。
value category 是一个一直存在的概念,任何一个变量都有两大属性:1. basic type ;2. value category。value category 经过 c++11 规范后,包括左值、右值、将亡值、纯右值、广义左值这些概念。
实现完美转发依赖于函数 std::forward,它的工作逻辑是这样的:如果入参的 value category 是右值,它就强制转换为右值引用并返回,否则,它不做转换。
理解这一点的前提是要知道,形参总是左值,只不过它的类型是右值引用。比如这样:
template<typename T>
void f(T&& t) {
    g(t);  // 此时调用的是 g(T& t) 版本; 因为 t 作为形参,它本身就是个左值。
}

void g(T& t) {
    std::cout << "g 左值引用版本" << std::endl;
}

void g(T&& t) {
    std::cout << "g 右值引用版本" << std::endl;
}
要能够调用 g(T&& t),需要这样:
template<typename T>
void f(T&& t) {
    g(std::forward<T>(t));   // std::forward 转发了 t 的 value category,如果 t 确实是一个右值
}
std::forward 与 std::move 的行为很像,都是将实参强制转换为右值引用。但 std::forward 是有条件的,只有实参原本是右值的情况下,才会强制转换为右值引用,而 std::move 是无条件的。
引用折叠
其实引用折叠才是最关键的,不知道或不理解引用折叠,永远无法理解 std::forward 是怎么工作的。问题的关键就在于搞清楚 std::forward 是怎么知道一个实参是左值还是右值的。
做法是这样的:
-
实参在传递给函数模板的时候,如果形参是万能引用,那么在推导的时候,就会把实参是左值还是右值的信息编码到推导出来的模板形参中。
-
编码的机制也很简单,如果实参是左值,则推导结果是左值引用类型;如果实参是右值,则推导结果是非引用类型。[4]
举个例子,对于这样的形式:
template<class T>
inf f(T&& x) {
    return g(std::forward<T>(x));
}

int i = 10;
f(i);
执行 f(i) 的时候,i 对应的形参 x 是一个万能引用,那么就需要把 i 是左值的信息编码到推导出来的 x 的推导结果中。此时,T 的推导结果是 int&,产生的模板实例是: f<int&>(int& && x);。
但这种 “reference-to-reference” (引用的引用) 有意义吗? int& && x 是合法的存在吗?
c++ 是禁止这么使用的,不允许用户这么写,但却允许编译器在特定的场合产生这种 “引用的引用”,模板实例化就是这种场合之一。
c++11 引入了对于 reference-to-reference 的处理,在模板实例化的时候,进行 “reference collasping”(引用折叠)。对 int& && x 进行处理后的结果是 int& x,即消除掉了 &&。
实际上,左值与右值组合起来共用4种,& &&、& &、&& &&、&& &,上面是属于 & &&。引用折叠的规则是这样的,只有 && && 是折叠成 && 的,其他三种都是折叠成 &。举例:
int& && x 折叠成 int & x;
int& & x 折叠成 int & x;
int&& & x 折叠成 int & x;
int&& && x 折叠成 int && x;
引用折叠发生的四种情形[4]:
- 模板实例化;
- auto 类型生成;
- 创建和运用
typedef和别名声明; decltype。
关于 auto&& 的类型推导与引用折叠,举例如下[4]:
Widget getWidget();
Widget w;

auto&& w1 = w;    // w1 的类型是 Widget& 。由于 w 是左值,此时 auto 被推导为 Widget&,
                  // 代入得 Widget& && w1 = w;,引用折叠后是 Widget& w1 = w 。

auto&& w2 = getWidget(); // w2 的类型是 Widget&& 。由于 getWidget() 返回了右值,
                         // 此时 auto 被推导为 Widget,代入得 Widget&& w2 = w,
                         // 不需要引用折叠。
拓展阅读
- 《modern effective c++》[4] 的条款 28,此书有纸质版,也有网友翻译的版本,见:条款二十八:理解引用折叠 。
用户定义字面量 (user-defined literals)
Manual: User-defined literals。
允许定义一个用户自定义的后缀,来使得整型、浮点型、字符型、字符串型的字面量产生对象。
函数原型是: ReturnType operator X(...) { ... }。
函数名的形式是:
- operator “” identifer
- operator ““ud-suffix
第1种形式已经废弃了。
第2种形式:
1)"" 与 ud-suffix 之间不能有空格;
2)ud-suffix 需要以下划线 _ 开头,不以下划线开头的是标准库保留的;
3)ud-suffix 不能以双下划线 __ 开头,这也是被保留的;
4)operator 与 "" 的空格可以省略,比如这样也是合法的: operator""ud-suffix;
只支持以下参数列表:
( const char* )
( unsigned long long int )
( long double )
( char )
( wchar_t )
( char8_t )     // (since c++20)
( char16_t )
( char32_t )
( const char*, std::size_t )
( const wchar_t*, std::size_t )
( const char8_t*, std::size_t )   // (since c++20)
( const char16_t*, std::size_t )
( const char32_t*, std::sizee_t )
如果是写成模板,大致形式:
template<char...>
double operator ""_x();
示例1[17]:
long double operator ""_w(long double);
std::string operator ""_w(const char16_t*, size_t);
unsigned    operator ""_w(const char*);

int main() {
    1.2_w;        // 调用 operator ""_w(1.2L);
    u"one"_w;     // 调用 operator ""_w(u"one", 3);
    12_w;         // 调用 operator ""_w("12");
    "two"_w;      // 错误,没有合适的字面量 operator
}
示例2[17]:
#include <string>

void        operator ""_km(long double);  // ok,比如 1.0_km 会调用
void        operator "" _km(long double); // 也 ok,不过已经废弃了
std::string operator ""_i18n(const char*, std::size_t);  // ok

template<char...>
double operator ""_pi(); // ok

float operator ""_e(const char*);  // ok

// 错误,后缀需要以下划线开头
float operator ""Z(const char*);

// 错误,"" 与 `_` 有空格的时候,`_`+大写字母开头的是保留的。
double operator"" _Z(long double);

// ok,"" 与 `_` 没有空格
double operator""_Z(long double);

// ok,字面量 operator 可以重载
double operator ""_Z(const char* args);

int main() {}
Attributes
Manual:cppreference - Attribute specifier sequence。
可以将任意的信息与一个名字关联起来。
语法是:[[ attribute-list ]]。 attribute-list 是一个逗号分隔的序列,包括 0 个或多个属性。
c++11 引入的属性包括:
| attributes | comment |
|---|---|
[[noreturn]] |
表明此函数没有返回 |
[[carries_dependency]] |
indicates that dependency chain in release-consume std::memory_order propagates in and out of the function |
示例:
// ok
[[noreturn]] void f() {
    throw "error";
}

// not ok,会报错
// void h() [[noreturn]];
raw string literals
一种新的声明字符串字面量的方式,这种方式不需要对一些特殊字符进行 escape。
语法: R"delimiter(raw_characters)delimiter"
- delimiter 是定界符,是一串可选的字符序列,不能包含这几种字符:小括号
()、反斜杠\、空格 ` `。 - raw_characters 是任意的字符序列,但不能包含
)delimiter。
示例[7]:
// msg1 与 msg2 是等价的
const char* msg1 = "\nHello,\n\tworld!\n";
const char* msg2 = R"(
Hello,
    world!
)";
char16_t 和 char32_t
标准类型,可用于表示 utf-8 编码的字符。
String Literal 的 Manual: cppreference - String Literal
char32_t u32_str[] = U"\u0123";  // 大U 表示 utf-32 的 string literal
char16_t u16_str[] = u"\u0123";  // 小u 表示 utf-16 的 string literal
char u8_str[] = u8"\u0123";      // u8 表示 utf-8 的 string literal
如何输出的参考:【C++】char16_t 和 char32_t
2. c++11 新的库特性
概览
参考自:《c++11:感觉像是门新语言》 [1]。
- unique_ptr 和 shared_ptr——依赖 RAII 的资源管理指针
- 内存模型和 atomic 变量
- thread、mutex、condition_variable 等——为基本的系统层级的并发提供了类型安全、可移植的支持
- future、promise 和 packaged_task,等——稍稍更高级的并发
- tuple——匿名的简单复合类型
- 类型特征(type trait)——类型的可测试属性,用于元编程
- 正则表达式匹配
- 随机数——带有许多生成器(引擎)和多种分布
- 时间——
time_point和 duration - unordered_map 等——哈希表
- forward_list——单向链表
- array——具有固定常量大小的数组,并且会记住自己的大小
- emplace 运算——在容器内直接构建对象,避免拷贝
- exception_ptr——允许在线程之间传递异常
智能指针
c++11 引入了三种新的智能指针:std::unique_ptr,std::shared_ptr,std::weak_ptr。而 std::auto_ptr 被标为了弃用(deprecated),并将在 c++17 最终移除。
std::unique_ptr
std::unique_ptr 是一种用于管理专属所有权的智能指针,它不允许复制,只允许转移所有权。它管理着一个专属的对象,不允许多个 std::unique_ptr 指向同一个对象。
推荐使用 std::make_unique 进行创建,但是这个要等到 c++14 才支持。在 c++11,只能使用裸指针进行创建。
不可复制是通过把拷贝构造函数声明为 deleted 实现的。
示例[7]:
// `p1` 持有 `Foo` 对象
std::unique_ptr<Foo> p1 { new Foo() };
if (p1) {
    p1->bar();
}

{
    // 现在 `p2` 持有 `Foo` 了
    // 能够这样构造是因为 std::unique_ptr 实现了移动构造函数
    std::unique_ptr<Foo> p2 { std::move(p1) };
    f(*p2);

    p1 = std::move(p2); // 所有权从 `p2` 转移回 `p1` 了
}

if (p1) {
    p1->bar();

    handle(p1->get());  // `get` 返回管理的对象
}

// 如果 `p1` 离开作用域,则 `Foo` 对象也会随之被销毁
// 这是利用了 RAII 机制
转移所有权的几种方式。
1、用 release 释放控制并返回裸指针。
auto p1 = std::make_unique<int>(10);
auto p2(p1.release());
// 不能再使用 p1 了
如果 p2 已经有管理对象了,需要使用 reset:
auto p1 = std::make_unique<int>(10);
auto p2 = std::make_unique<int>(20);
p2.reset(p1.release()); // `reset` 会释放已经持有的对象,然后用新的对象赋值
2、用 std::move 触发移动构造
auto p1 = std::make_unique<int>(10);
auto p2 (std::move(p1));  // 触发移动构造
// 不能再使用 p1 了
std::shared_ptr
std::shared_ptr 是一种使用引用计数管理共享所有权的智能指针,允许多个 std::shared_ptr 的拷贝指向同一份资源,每次拷贝会触发引用计数+1,每次析构会触发引用计数-1,最后一个 shared_ptr 析构的时候,释放资源。
api 参考:cppreference shared_ptr。
示例 [7]:
void f1(std::shared_ptr<T> t) {
    // do something with t
}

void f2(std::shared_ptr<T> t) {
    // do something with t
}

void f3(std::shared_ptr<T> t) {
    // do something with t
}

auto p1 = std::make_shared<T>();;

// 可能在别的线程执行
f1(p1);
f2(p1);
f3(p1);
使用上的注意 [12]:
1、使用 std::make_shared 进行创建,这个在 c++11 就支持了。如果不使用 std::make_shared,那么在 c++17 之前的版本,可能会发生内存泄漏。
2、对 std::shared_ptr 本身的操作是线程安全的,在修改引用计数时,使用了原子操作,所以可以在多线程环境下,可以安全的复制和销毁指向同一个对象的 shared_ptr 实例。但是,对所指对象的操作不一定是线程安全的,这个仍然需要用线程同步的方法来保证线程安全。
3、防止循环引用,如果 2 个或多个 std::shared_ptr 互相持有对方,会阻止引用计数降为零,导致内存泄漏,可以尝试使用 std::weak_ptr 解决问题。
4、不要一个裸指针初始化多个 std::shared_ptr 实例,会出现重复 delete,导致程序崩溃。
5、不要 delete std::shared_ptr::get() 返回的裸指针。
6、不是 new 出来的资源要自定义删除器。
7、通过 shared_from_this() 返回 this 指针,不要把 this 作为 shared_ptr 返回,因为 this 本质上是裸指针。
struct X : public std::enable_shared_from_this<X> {
    std::shared_ptr<X> GetSelf() {
        return shared_from_this();
        // 不要这样返回 return std::shared_ptr<X>(this);
    }
};
std::weak_ptr
std::weak_ptr 是用来监视 std::shared_ptr 的生命周期的,它的拷贝和析构都不会影响引用计数。lua 中也有类似的实现,叫弱表。
提供的成员函数不多,可参考:cppreference weak_ptr。主要有三个:use_count,expired,lock。
主要用途:
- 防止循环引用。
- 只需要知道资源是否还存在,不需要共享资源。
示例[7]:
struct Foo {};
std::weak_ptr<Foo> wptr;

{
    auto sptr = std::make_shared<Foo>();
    wptr = sptr;  // 在作用域内:wptr.use_count() == 1 ;  wptr.expired() == false;

    auto sptr2 = wptr.lock(); // sptr2 是 sptr 的一个拷贝
}

// 离开了作用域:wptr.use_count() == 0; wptr.expired() == true;

auto sptr3 = wptr.lock();  // sptr3.use_count() == 0;  (!sptr3) == true;
std::shared_ptr 与 std::weak_ptr 的底层实现
参考:
智能指针作为函数参数的问题
智能打针的使用原则:
1、智能指针的核心是所有权管理,无关所有权的时候首选裸指针或引用。
使用参考:
std::make_shared
推荐使用 std::make_shared 拷贝 shared_ptr,而不是使用 new,基于以下三个理由:
1、使用 new 需要写两次类型名
std::make_shared<Foo>(10) vs std::shared_ptr<Foo>(new Foo())。
2、使用 new 可能会因为异常而导致内存泄漏
在 c++17 之前,对于这样的函数调用 f( std::shared_ptr<Foo>(new Foo()), get_some_param() ),编译器给出的参数求值顺序可能是这样的:
- 执行
new Foo() - 执行
get_some_param() - 构造
shared_ptr
如果第 2 步异常了,那么第 1 步 new 出来的对象就内存泄漏了。
不过这种情况在 c++17 之后就不会,要么就是 (1、3、2),要么就是 (2、1、3),1 跟 3 可以确保连续完成了。
相关文档:
- Trip report: Summer ISO C++ standards meeting (Oulu)
- GotW #56
- Refining Expression Evaluation Order for Idiomatic C++
- What are the evaluation order guarantees introduced by C++17?
- C++求值顺序
- C++避坑—函数参数求值顺序和使用独立语句将newed对象存储于智能指针中
关于求值顺序导致的大问题,还可以参考这篇文章:《C++17之定义表达式求值顺序》,情况比想象中的还要严重。
3、使用 new 需要 2 次内存分配
而不使用 new 可以给编译器创造优化空间,有可能用一次内存分配即可。
因为 std::shared_ptr 除了包含一个指向共享的资源的指针,还包含一个保存引用计数信息的控制块,这个控制块也需要申请内存空间的。使用 std::make_shared 令编译器有机会分配一次内存,同时申请好资源的内存空间和控制块的内存空间。
memory model
相关内容很复杂,需要比较长的篇幅才能讲清楚,写在了另一篇文章:《C++ 笔记:Memory Model》 。
线程相关
参考文章:
线程相关的有很多,包括:std::thread,std::mutex,std::condition_variable,std::lock,std::atomic,std::call_once,std::future,async 等。
c++11 提供这些线程实现,意义主要在于可跨平台使用。有些文章把它捧得很高,实际上没必要,在 linux 上,它只不过是对 posix 线程库的封装而已。
std::thread
std::thread 即线程类。对应 posix 中的 pthread。
特点:
- 构造出来则立即运行。
限制:
- 只能默认构造、移动构造、移动赋值,不能拷贝构造、拷贝赋值。
主要操作:
-
join: 等待线程执行完成。 -
detach: 把线程和线程对象分离,允许线程继续独立的运行。分离之后,线程对象 (即std::thread的实例)不再持有线程。独立出来的线程在运行结束后,会清理占用的资源。
对于一条创建出来的子线程,要么 join,要么 detach。否则可能会出现这样的问题:母线程运行结束,开始释放资源,会把子线程对象也析构掉,但子线程还在运行中,最终导致出错。如果不想 join,就只能 detach,让子线程与子线程对象分离,使得子线程的运行不受子线程对象析构的影响。
示例 [13]:
#include <iostream>
#include <thread>

int main() {
    auto func1 = []() {
        for (int i = 0; i < 5; ++i) {
            std::cout << "func1: " << i << std::endl;
        }
    };

    std::thread t1(func1);
    if (t1.joinable()) {
        t1.detach();  // detach 之后,不能再 join 了,t1.joinable() 会返回 false
    }

    auto func2 = [](int x) {
        for (int i = 0; i < x; ++i) {
            std::cout << "func2: " << i << std::endl;
        }
    };

    std::thread t2(func2, 10);
    if (t2.joinable()) {
        t2.join();  // 等待 t2 执行完
    }

    return 0;
}
std::this_thread
std::this_thread 是一个 namespace,包含了可以访问当前运行线程的一些函数。
头文件: <thread>。
主要函数:
1、std::this_thread::get_id
Manual: 《cppreference - get_id》
原型: std::this_thread::id get_id() noexcept;
作用: 获得当前运行线程的 id。
示例:
std::this_thread::id this_id = std::this_thread::get_id();
2、std::this_thread::sleep_for
Manual: 《cppreference - sleep_for》
原型:
template< class Rep, class Period>
void sleep_for( const std::chrono::duration<Rep, Period>& sleep_duration );
作用:阻塞当前线程至少 sleep_duration 指定的时长。
示例:
std::this_thread::sleep_for(std::chrono::seconds(2));
如果是 c++14,可以这样:
using namespace std::chrono_literals;
std::this_thread::sleep_for(2000ms);
3、std::this_thread::sleep_until
Manual: 《cppreference - sleep_until》
原型:
template< class Clock, class Duration >
void sleep_until( const std::chrono::time_point<Clock, Duration>& sleep_time );
作用:阻塞当前线程直到指定的时间点。
示例:
using std::chrono::operator""ms;
std::this_thread::sleep_until(std::chrono::steady_clock::now() + 2000ms);
std::mutex
std::mutex 即互斥锁,是一种同步原语,应用于竞争的场景。对应 pthread 中的 pthread_mutex。
头文件:<mutex>。
Manual: 《cppreference - mutex》 s
c++11 中,mutex 分了四种:
- std::mutex:不可递归,不带超时
- std::recursive_mutex:可递归,不带超时
- std::timed_mutex:带超时,不可递归
- std::recursive_timed_mutex:带超时,可递归
可递归的意思就是同一线程加锁了,可以再次加锁。大部分情况下,用 std::mutex 就够了。可递归的要慎用,可能会导致意想不到的问题:比如外层逻辑加锁了开始修改,内层逻辑也加锁了修改同一资源。
通常情况下,代码中不要直接裸用 std::mutex。用 std::unique_lock,std::lock_guard 或 std::scoped_lock (since c++17),它们可以更(异常)安全的管理锁资源。
std::mutex 示例:
#include <thread>
#include <mutex>
#include <iostream>
#include <string>
#include <vector>

std::mutex g_mtx;

int main() {
    auto func = [](std::string name) {
        // 以下仅仅是展示用法,正常情况下,应该使用
        // std::lock_guard 或 std::unique_lock 来保证安全的使用锁
        g_mtx.lock();
        for (int i = 0; i < 5; ++i) {
            std::cout << name << ": " << i << std::endl;
        }
        g_mtx.unlock();
    };

    std::vector<std::thread> vec;

    for (int i = 0; i < 5; ++i) {
        vec.emplace_back(func, "thread" + std::to_string(i+1));
    }

    for (auto& t : vec) {
        t.join();
    }

    return 0;
}
std::timed_mutex 示例:
Manual: 《cppreference - timed_mutex》
#include <iostream>
#include <mutex>
#include <thread>
#include <chrono>
#include <vector>

std::timed_mutex g_mtx;

int main() {
    auto func = [](int x) {
        // try_lock_for 以时长作为参数,尝试获得锁,直到超时,或者获取成功
        // 如果成功 返回 true;否则返回 false 。
        // 类似的函数还有 try_lock_until,是以时间点作为参数
        if (g_mtx.try_lock_for(std::chrono::milliseconds(100))) {
            std::this_thread::sleep_for(std::chrono::seconds(1));
            for (int i = 0; i < x; ++i) {
                std::cout << i << " ";
            }
            std::cout << std::endl;
            g_mtx.unlock();
        } else {
            std::cout << "lock fail" << std::endl;
        }
    };

    std::vector<std::thread> vec;

    for (int i = 0; i < 5; ++i) {
        vec.emplace_back(func, 10);
    }

    for (auto & t : vec) {
        t.join();
    }

    return 0;
}
std::lock
锁包装器 (wrapper),利用 RAII 机制,以异常安全的方式控制锁资源,包括 std::lock_guard,std::unique_lock。
std::lock_guard
Manual: 《cppreference - lock_guard》
头文件: <mutex>
比较简单,只有构造函数和析构函数。构造时加锁,析构时解锁。
示例:
#include <thread>
#include <mutex>
#include <iostream>
#include <string>
#include <chrono>
#include <vector>

std::mutex g_mtx;

int main() {
    auto func = [](std::string name) {
        std::lock_guard<std::mutex> lock(g_mtx);
        for (int i = 0; i < 5; ++i) {
            std::cout << name << ": " << i << std::endl;
            std::this_thread::sleep_for(std::chrono::milliseconds(100));
        }
    };

    std::vector<std::thread> vec;

    for (int i = 0; i < 5; ++i) {
        vec.emplace_back(func, "thread" + std::to_string(i+1));
    }

    for (auto & t : vec)
        t.join();

    return 0;
}
std::unique_lock
Manual:《cppreference unique_lock》
头文件:<mutex>
比 std::lock_guard 复杂得多,提供了更多的功能。
按照 specification 的描述,std::unique_lock 是一个通用目标的 mutex 所有权包装器,支持延迟加锁、时间约束的尝试加锁、递归加锁,转移锁的所有权,以及被条件变量使用。
std::unique_lock 不可拷贝,但可移动。
主要的 api :
| api | 作用 |
|---|---|
| lock | 阻塞的加锁关联的 mutex |
| try_lock | 不阻塞的尝试加锁关联的 mutex |
| try_lock_for | 尝试对关联的 mutex 加锁:成功或者超过指定时长而失败 |
| try_lock_until | 尝试对关联的 mutex 加锁:成功或者超过指定时间点失败 |
| unlock | 解锁关联的 mutex |
| swap | 与另一个 std::unique_lock 交换状态量 |
| release | 与关联的 mutex 断开联系,但并不解锁 |
| mutex | 返回关联的mutex的指针 |
| owns_lock | 测试当前是否与mutex有关联并加了锁 |
| operator bool | 作用与 owns_lock 相同 |
简单示例:
std::unique_lock 的简单用法可以提供跟 std::lock_guard 一样的效果,只要将上面的示例中的 std::lock_guard<std::mutex> lock(g_mtx); 改为 std::unique_lock<std::mutex> lock(g_mtx); 即可。
高级示例 [15]:
#include <iostream>
#include <mutex>
#include <thread>

struct Box {
    explicit Box(int num) : num_things {num} {}

    int num_things;
    std::mutex m;
};

void transfer(Box& from, Box& to, int num) {
    // 暂时不加锁
    std::unique_lock lock1{from.m, std::defer_lock};
    std::unique_lock lock2{to.m, std::defer_lock};

    // 同时加锁,不会死锁
    std::lock(lock1, lock2);

    from.num_things -= num;
    to.num_things += num;

    // 离开作用域后,lock1 和 lock2 会自动释放 from.m 和 to.m
}

int main() {
    Box acc1 {100};
    Box acc2 {50};

    std::thread t1{transfer, std::ref(acc1), std::ref(acc2), 10};
    std::thread t2{transfer, std::ref(acc2), std::ref(acc1), 5};

    t1.join();
    t2.join();

    std::cout << "acc1: " << acc1.num_things << "\n"
              << "acc2: " << acc2.num_things << "\n";

    return 0;
}
输出:
acc1: 95
acc2: 55
std::condition_variable
std::condition_variable 即条件变量,也是一种同步原语,应用于协作的场景。对应 pthread 中的 pthread_cond。
Manual: 《cppreference - condition_variable》
头文件:<condition_variable>
条件变量需要配合 std::mutex 使用,这个与常规的条件变量实现没什么差异。同样也需要处理虚假唤醒(spurius wakeup)问题,即在循环里判断条件是否满足,不满足则继续 wait。
虚假唤醒的研究,我写在了这篇文章:《antsmallant - 多线程笔记:同步及同步原语》 。
主要的 api :
| api | 功能 |
|---|---|
| notify_one | 唤醒一条等待线程 |
| notify_all | 唤醒所有等待线程 |
| wait | 阻塞直到被唤醒 |
| wait_for | 阻塞直到被唤醒或达到指定时长 |
| wait_until | 阻塞直到被唤醒或达到指定时间点 |
| native_handle | 返回原始句柄,这个与具体实现有关,在Posix系统,可能是 pthread_cond_t*,在Windows,可能是 PCONDITION_VARIABLE |
注意:
- 一般在
notify_之前,要先解锁,避免把等待线程唤醒了,但它又需要阻塞在加锁上。 - c++ 里
condition_variable的wait与 pthread 里的pthread_cond_wait有小小差异,c++ 这里支持两个函数原型:
void wait( std::unique_lock<std::mutex>& lock );

template< class Predicate >
void wait( std::unique_lock<std::mutex>& lock, Predicate pred );
第一个原型跟 pthread_cond_wait 类似,而第二个则支持把谓词作为参数传进去,那么就可以省去循环式的写法了。
第一个原型一般得这么写:
std::unique_lock lock(some_mutex);
while (check_something() != true) {
    cond.wait(lock);
}
而第二个原型可以这么写:
std::unique_lock lock(some_mutex);
cond.wait(lock, []() { return check_something() == true; });
示例 [16]:
#include <condition_variable>
#include <mutex>
#include <thread>
#include <iostream>
#include <string>

std::mutex m;
std::condition_variable cv;
std::string data;
bool ready = false;
bool processed = false;

void worker_thread() {
    // 等待直到 main() 发送数据
    std::unique_lock lk(m);
    cv.wait(lk, []{ return ready; });  // 相当于传统的循环检测条件是否满足的写法

    // 等待结束,成功获得锁
    std::cout << "Worker thread is processing data\n";
    data += " after processing";

    // 向 main() 发送数据
    processed = true;
    std::cout << "Worker thread signals data processing completed\n";

    // 在 notify 前手动的释放锁,避免唤醒了等待线程,但该线程又阻塞在加锁上
    lk.unlock();
    cv.notify_one();
}

int main() {
    std::thread worker(worker_thread);

    data = "Example data";
    // 向 worker thread 发送数据
    {
        std::lock_guard lk(m);
        ready = true;
        std::cout << "main() signals data ready for processing\n";
    }
    cv.notify_one();

    // 等待 woker
    {
        std::unique_lock lk(m);
        cv.wait(lk, []{ return processed; });
    }
    std::cout << "Back in main(), data = " << data << "\n";

    worker.join();

    return 0;
}
输出:
main() signals data ready for processing
Worker thread is processing data
Worker thread signals data processing completed
Back in main(), data = Example data after processing
std::atomic
std::atomic_flag 实现自旋锁
参考: 《C++11实现自旋锁》 [14]。
c++11 没有直接提供类似于 pthread_spin 这样的自旋锁实现。不过可以使用 std::atomic_flag 来实现,它是一个无锁的二值类型。不能用 std::atomic 实现,因为 c++ 没有强制要求 std::atomic 的实现必须是无锁的。
示例 [14]:
#include <atomic>
#include <thread>
#include <chrono>
#include <iostream>
#include <mutex>

// 实现自旋锁
class spin_mutex {
    std::atomic_flag flag = ATOMIC_FLAG_INIT;
public:
    spin_mutex() = default;
    spin_mutex(const spin_mutex&) = delete;
    spin_mutex& operator = (const spin_mutex&) = delete;
    void lock() {
        while (flag.test_and_set(std::memory_order_acquire))
            ;
    }
    void unlock() {
        flag.clear(std::memory_order_release);
    }
};


// 测试自旋锁
spin_mutex g_spin_mtx;

int main() {

    auto func = [](std::string name) {
        // 同样可以使用 lock_guard 来保护锁
        std::lock_guard<spin_mutex> lock(g_spin_mtx);
        std::this_thread::sleep_for(std::chrono::seconds(5));
        for (int i = 0; i < 5; ++i)
            std::cout << name << ": " << i << std::endl;
    };

    std::thread t1(func, "t1");
    std::thread t2(func, "t2");

    t1.join();
    t2.join();

    return 0;
}
std::future 相关
std::move
无条件的把入参转换为右值,返回右值引用。需要注意的是,它并不是执行什么移动操作,而是执行类型转换。
在 c++11 中,std::move 可以类似于这样实现[4]:
template<typename T>
typename remove_reference<T>::type&&
move(T&& param) {
    using ReturnType =
        typename remove_reference<T>::type&&;
    return static_cast<ReturnType>(param);
}
而使用 c++14,可以类似于这样实现[4]:
template<typename T>
decltype(auto) move(T&& param) {
    using ReturnType = remove_reference_t<T>&&;
    return static_cast<ReturnType>(param);
}
remove_reference_t 是 c++14 引入的 helper function,它的原型 ( 参考:cppreference-remove_reference ) 是:
template< class T >
using remove_reference_t = typename remove_reference<T>::type;
std::forward
当入参是右值时,把入参转换为右值,返回右值引用。
在 c++11 中,可以类似于这样实现[4]:
template<typename T>
T&& forward(typename remove_reference<T>::type& param) {
    return static_cast<T&&>(param);
}
而在 c++14,可以这样实现[4]:
template<typename T>
T&& forward(remove_reference_t<T>& param) {
    return static_cast<T&&>(param);
}
这里有个疑问:param 的实参为右值的时候,为什么 std::forward 的参数类型也可以是左值引用呢?
原因在于,std::forward 接收的参数是上层函数的形参,比如这样:
template<typename T>
void func(T&& param) {
    func2(std::forward<T>(param));
}
其中的 param 实际上是形参,而形参总是一个左值。
std::to_string
可以把一个数值类型转换成 std::string。
示例:
std::to_string(3.14);        // "3.14"
std::to_string(2147483647);  // "2147483647"
std::to_string(-10);         // "-10"
std::array
std::array 是基于 c 数组的容器,大小是固定的,支持常规的容器操作,比如排序。
示例 [7]:
std::array<int, 4> arr = {1, 17, 2, 9};
std::sort(arr.begin(), arr.end());  // arr == {1, 2, 9, 17}
for (int& x : arr) x += 10;           // arr == {11, 12, 19, 27}
std::chrono
chrono 有编年史、计时器的意思。chrono 库包含了一些类型以及一些工具函数,可以处理持续时间、时钟、时间点之类的问题。一个使用场景是用于基准测试。
示例 [7]:
std::chrono::time_point<std::chrono::steady_clock> start, stop;
start = std::chrono::steady_clock::now();
// do something
stop = std::chrono::steady_clock::now();

std::chrono::duration<double> elapsed_seconds = stop-start;
double t = elapsed_seconds.count();   // double 精度的 t 秒钟
std::tuple
即元组,是一个固定大小的集合,可以包含各种类型,可以认为是 std::pair 的范化。
可以使用 std::tuple 或 std::make_tuple 构造。
可以使用 std::get 或 std::tie 进行解包 (unpacking),如果是 c++17,可以使用结构化绑定进行解包。
示例 [7]:
auto myprofile = std::make_tuple(10, "LA", "Mike");
std::get<0>(myprofile);  // 10
std::get<1>(myprofile);  // "LA"
std::get<2>(myprofile);  // "Mike"

// 或者这样构造
auto yourprofile = std::tuple<int, std::string, std::string>(15, "NY", "Tim");
std::tie
std::tie 实际上是构造了由左值引用或 std::ignore 作为参数形成的一个 tuple。但这种方式,也使得 std::tie 可以用于解包一个 std::tuple 或 std::pair。
示例 [7]:
int age;
std::string name;
std::string city;
std::tie(age, name, city) = std::make_tuple(100, "Mike", "LA");
// 也可以这样
std::tie(std::ignore, name, std::ignore) = std::make_tuple(100, "Mike", "LA");

std::string yes, no;
std::tie(yes, no) = std::make_pair("yes", "no");
int age = 10;
std::string name = "Kitty";
std::string nation = "JP";
auto tp = std::tie(age, name, nation); // tp 是一个 std::tuple
std::tie 之所以能用于解包,原因在于它构造的 tuple 是由 lvalue reference 构成的。
std::tie(age, name, city) = std::make_tuple(100, "Mike", "LA");
实际上是:
std::tuple<int&, std::string&, std::string&> {age, name, city} =
    std::make_tuple(100, "Mike", "LA");
而 std::tuple<int&, std::string&, std::string&> {age, name, city} 看起来是一个 rvalue,怎么可以赋值的?
这里实际上是这样调用的:
(std::tuple<int&, std::string&, std::string&> {age, name, city}).operator = (
                                        std::make_tuple(100, "Mike", "LA"));
std::tuple 重载了很多个 operator = 函数,可参考这里:《cppreference - std::tuple<Types...>::operator=》。
当然,也重载了 std::pair 到 std::tuple 的转换,所以上面的例子中,std::tie 也可以用于解包 std::pair。
更具体的关于 std::tie 是怎么工作的,可参考这篇文章: 《How does std::tie work?》。
无序的容器 (unordered container)
这些容器提供常数时间复杂度的搜索、插入、删除操作,代价是使用哈希算法,牺牲了元素的有序性。包括这些: unordered_set, unordered_multiset, unordered_map, unordered_multimap。
为容器增加 emplace_back 函数
是 c++11 新引入的函数,允许直接在容器的尾部构造一个元素,而不需要先创建一个临时对象再将其插入容器中。emplace_back 接受任意数量的参数,并将这些参数传递给元素的构造函数来创建新的元素,可以省略掉一次拷贝或移动操作。
原型:
template< class... Args >
void emplace_back( Args&&... args );
示例:
struct X {
    int id;
    std::string name;
    X(int _id, std::string _name) : id(_id), name(_name) {}
};

int main() {
    std::vector<X> xvec;
    xvec.emplace_back(1, "Jim");
    xvec.emplace_back(2, "Lily");
    xvec.push_back(X{3, "Lucy"});
}
3. 拓展阅读
4. 参考
[1] Bjarne Stroustrup. c++11:感觉像是门新语言. Cpp-Club. Available at : https://github.com/Cpp-Club/Cxx_HOPL4_zh/blob/main/04.md, 2023-6-11.
[2] cppreference. Forwarding references. Available at https://en.cppreference.com/w/cpp/language/reference#Forwarding_references.
[3] open-std. Forwarding References. https://www.open-std.org/jtc1/sc22/wg21/docs/papers/2014/n4164.pdf.
[4] [美]Scott Meyers. Effective Modern C++(中文版). 高博. 北京: 中国电力出版社, 2018-4.
[5] cppreference. types. Available at https://en.cppreference.com/w/cpp/language/types.
[6] wikipedia. 64-bit computing. Available at https://en.wikipedia.org/wiki/64-bit_computing#64-bit_data_models.
[7] AnthonyCalandra. C++11. Available at https://github.com/AnthonyCalandra/modern-cpp-features/blob/master/CPP11.md.
[8] cppreference. Type alias, alias template. Available at https://en.cppreference.com/w/cpp/language/type_alias.
[9] cppreference. decltype specifier. Available at https://en.cppreference.com/w/cpp/language/decltype.
[10] [美] Stanley B. Lippman, Josée Lajoie, Barbara E. Moo. C++ Primer 中文版(第 5 版). 王刚, 杨巨峰. 北京: 电子工业出版社, 2013-9: 58.
[11] 蓝色. anster to C++ const 和 constexpr 的区别. Available at https://www.zhihu.com/question/35614219/answer/63798713, 2015-9-15.
[12] 程序喵大人. c++11新特性之智能指针. Available at https://zhuanlan.zhihu.com/p/137958974, 2020-5-3.
[13] 程序喵大人. c++11新特性之线程相关所有知识点. Available at https://zhuanlan.zhihu.com/p/137914574, 2020-5-3.
[14] 破晓. C++11实现自旋锁. Available at https://blog.poxiao.me/p/spinlock-implementation-in-cpp11/, 2014-4-20.
[15] cppreference. unique_lock. Available at https://en.cppreference.com/w/cpp/thread/unique_lock.
[16] cppreference. condition_variable. Available at https://en.cppreference.com/w/cpp/thread/condition_variable.
[17] cppreference. User-defined literals. Available at https://en.cppreference.com/w/cpp/language/user_literal.